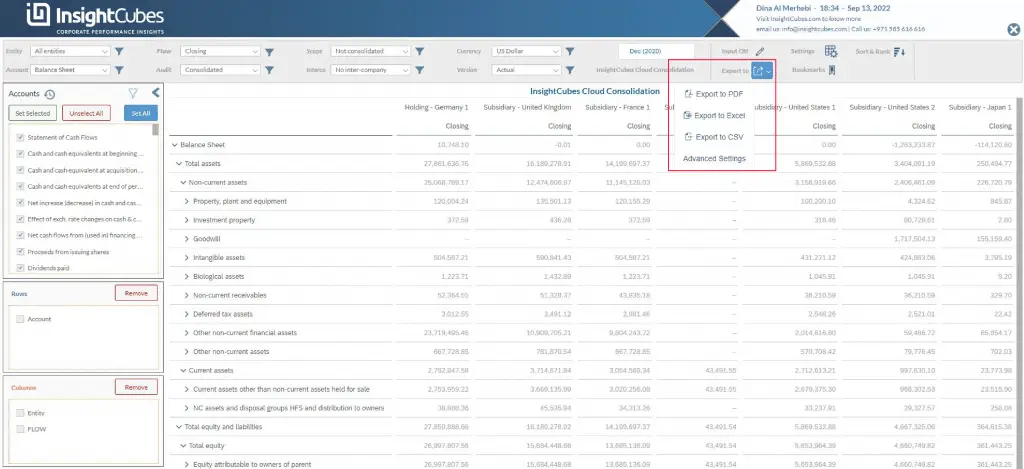
How to export reports to Excel, CSV and PDF with SAP Analytics Designer
In this blog, we explain how to export data in the widgets within the analytics application to Excel, CSV, and PDF. This method is simple and easy to use. In a follow-up blog, we will cover an advanced export method that gives users more control over the output content.
For now, let’s get started with this easy and quick way to configure our exports.
First, configure Export to Excel, Export to CSV, and Export to PDF in scripting. Then write the JavaScript code.
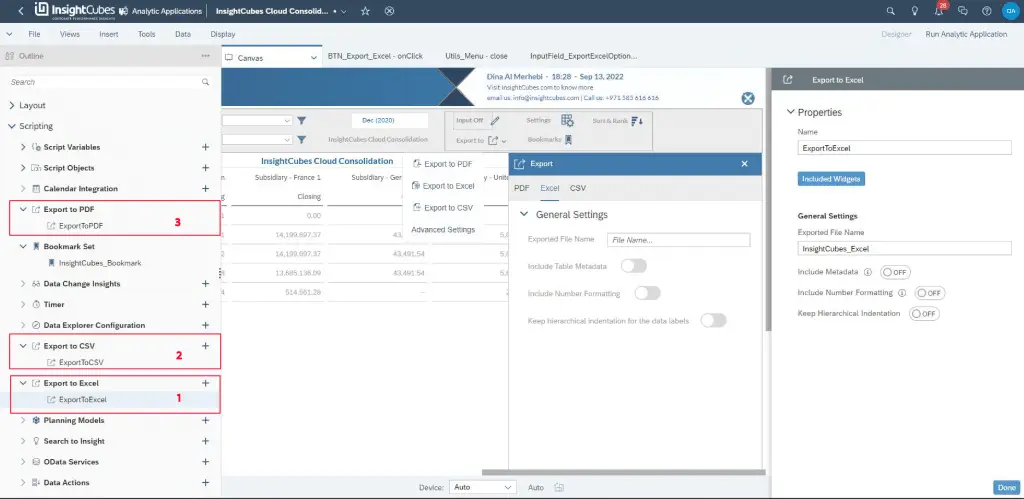
Then we configure the Properties for each of the export Scripting settings.
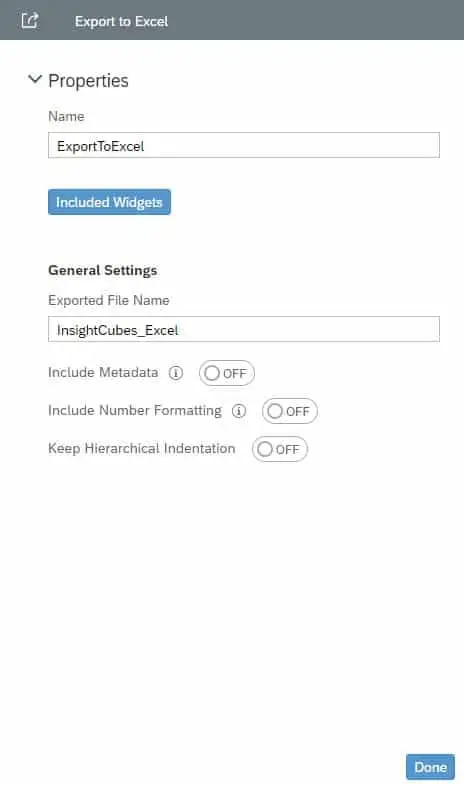
The below snippet is for the Export to Excel Properties. Name it ExportToExcel for later use in JavaScript. Set the exported file name; in our case, InsightCubes_Excel. Then decide whether to enable Include Metadata, Include Number Formatting, and Keep Hierarchy Indentation.
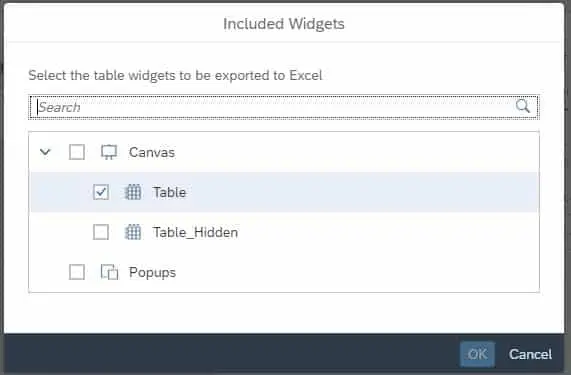
We also need to select the Included Widgets in the Exported Excel file. In the snippet below we have one widget selected (Table).
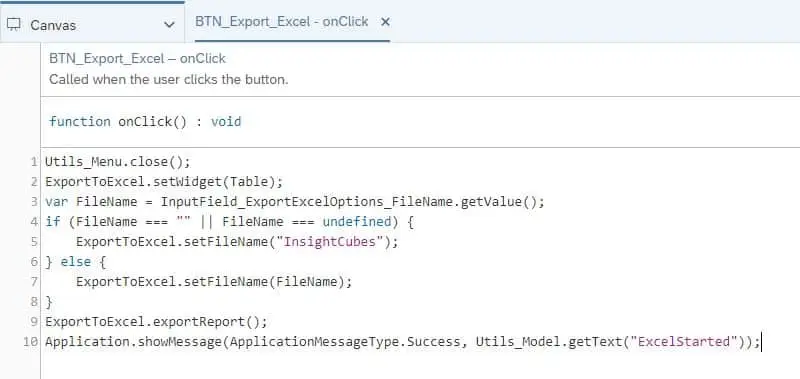
Now we will add the Java script to the Export to Excel button on click event.

The below onclick event java script for Export to Excel starts by closing the menu (Line 1), then setting the export to Excel widget (Line 2) and populating a local variable member with the entered text in the input field named InputField_ExportExcelOptions_FileName (Line 3). In case the user did not enter any text in the input field (Line 4), we populate a fixed text named InsightCubes (Line 5), otherwise, if the user entered a text (Line 6), we set the file name as entered by the user and stored by the local variable called FileName (Line 7).
Last, the export to Excel is executed (Line 9), and an Application Message of Type Success is shown to the user (Line 10).
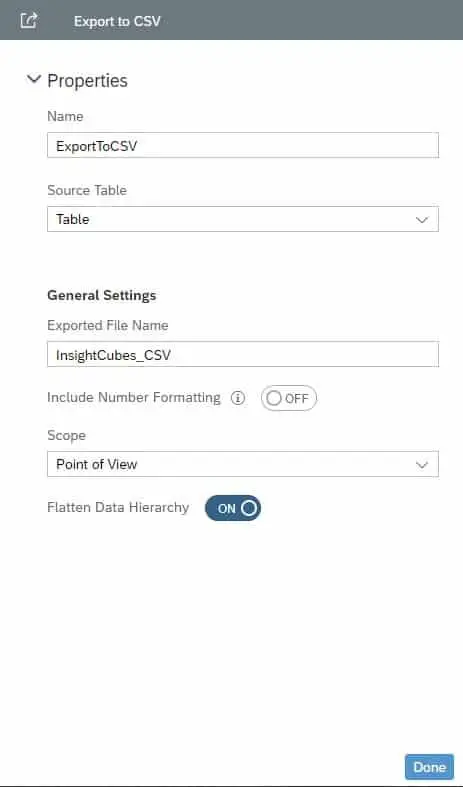
The below snippet is for the Export to CSV Properties. We name it ExportToCSV to use in java script later. Select the data source for the exported CSV file, in our case it is the widget (Table). Designate an exported file name; in our case, InsightCubes_CSV. Then decide whether to enable Include Number Formatting. Selecting the Scope either as a Point of View or All and whether to Flatten Data Hierarchy or not.
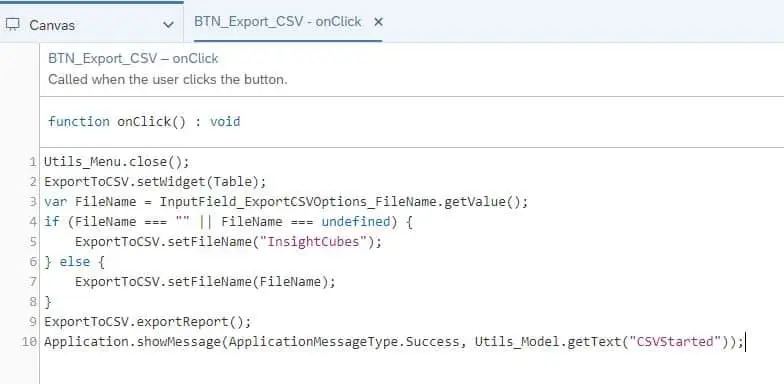
Now we will add the JavaScript to the Export to CSV button on click event.
The below onclick event java script for Export to CSV starts by closing the menu (Line 1), then setting the export to CSV widget (Line 2) and populating a local variable member with the entered text in the input field named InputField_ExportCSVOptions_FileName (Line 3). In case the user did not enter any text in the input field (Line 4), we populate a fixed text named InsightCubes (Line 5), otherwise, if the user entered a text (Line 6), we set the file name as entered by the user and stored by the local variable called FileName (Line 7).
Last, the export to CSV is executed (Line 9), and an Application Message of Type Success is shown to the user (Line 10).
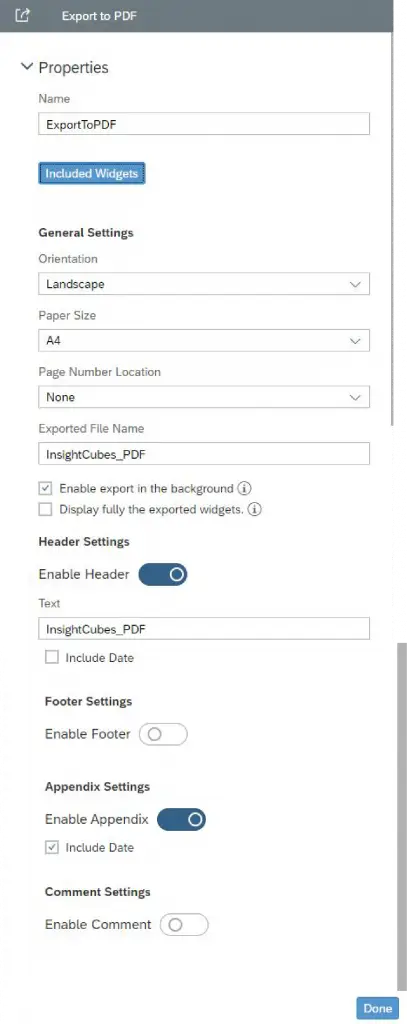
The below snippet is for the Export to PDF Properties. We name it ExportToPDF to use in javascript later. Choose the desired General Settings. In our case Orientation is Landscape, Paper Size is A4, Page Number Location is set to None, Exported File Name is InsightCubes_PDF. We have Enable export in the background checked, and the Display fully the exported widgets unchecked, this option enables printing the dashboard as a report (note only Tables are currently supported). Then we detail our Header Settings, Footer Settings, Appendix Settings, and Comment Settings.
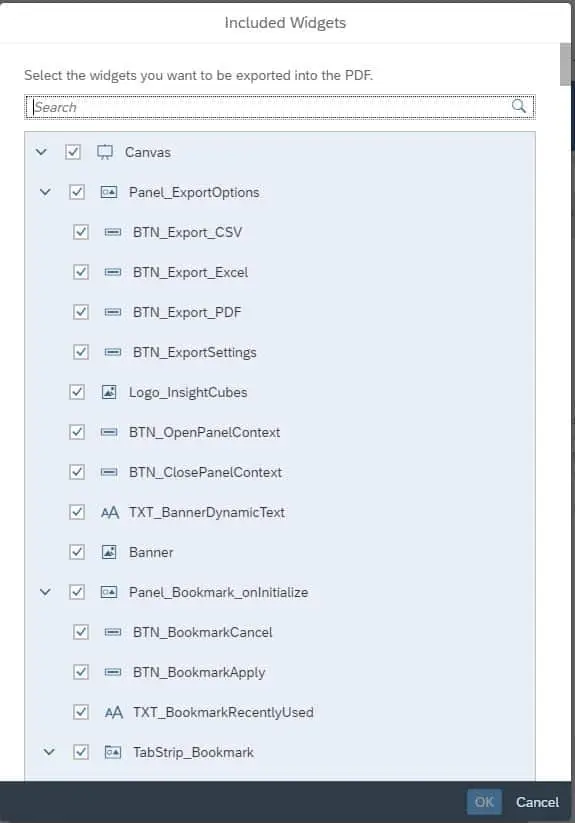
We also need to select the widgets included in the Export to PDF. The Included Widgets for the Export to PDF Properties has a different approach than Export to Excel and CSV. You can choose which details appear in the PDF. In our case, all widget elements are selected.
Now we will add the JavaScript to the Export to PDF button on click event.
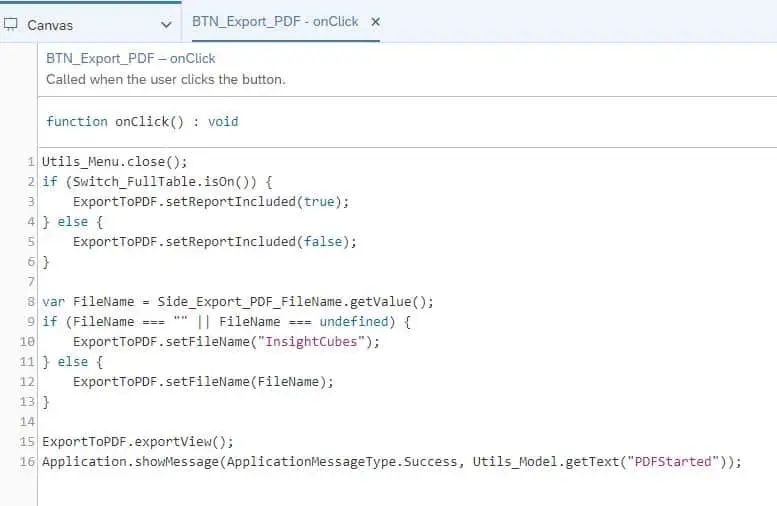
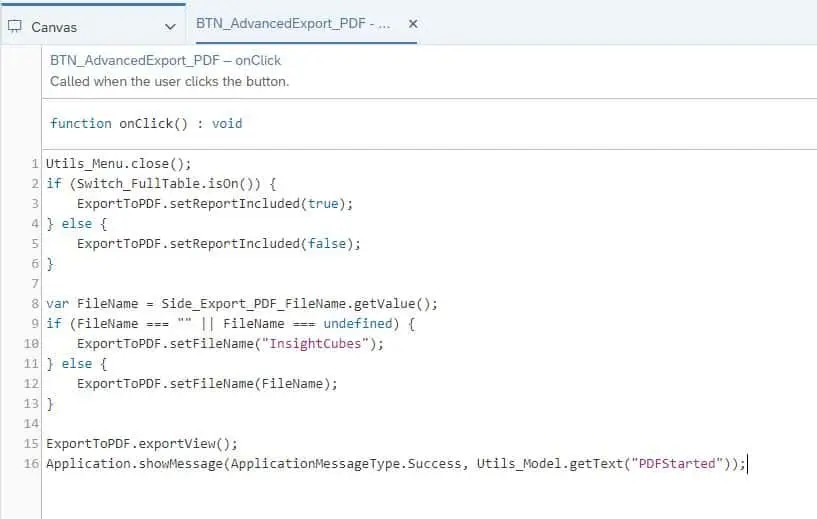
The below onclick event java script for Export to PDF starts by closing the menu (Line 1), then we set a condition as to whether the user clicked on Switch_FullTable or not, which in turn returns whether the export of all included tables in full length (report) is enabled when the analytic application is exported to a PDF file (Line 2 to 6). Then populating a local variable member with the entered text in the input field named Side_Export_PDF_FileName (Line 8). In case the user did not enter any text in the input field (Line 9), we populate a fixed text named InsightCubes (Line 10), otherwise, if the user entered a text (Line 11), we set the file name as entered by the user and stored by the local variable called FileName (Line 12).
Last, the export to PDF is executed (Line 15), and an Application Message of Type Success is shown to the user (Line 16).
Advanced Exporting of Reports
In this blog we will be discussing an advanced, and more detailed method of exporting data in the widgets within the analytics application to Excel, CSV and PDF that provides further options to end users to configure the content of the output. We discussed the simple way of exporting in another blog called Exporting Reports To Excel, CSV, And PDF With SAP Analytics Designer.
Now, lets get started with this more detailed and advanced way to configure our exports with advanced settings.

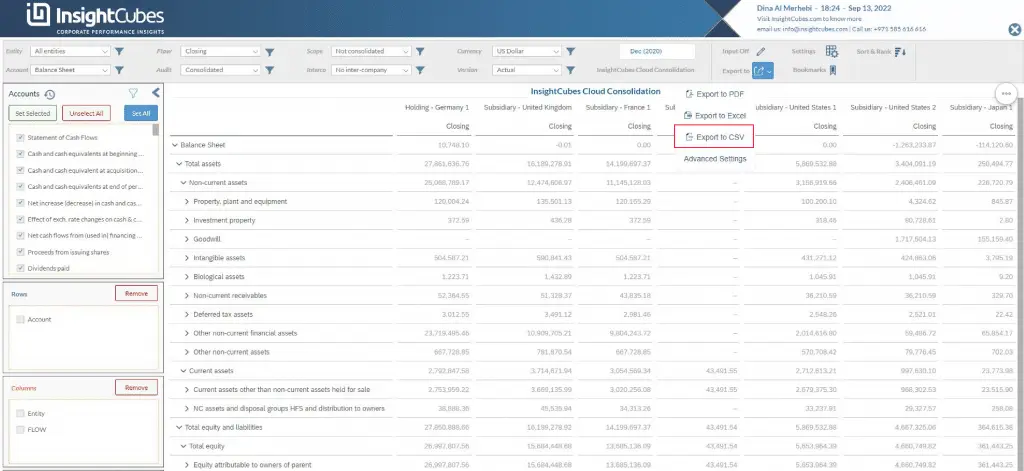
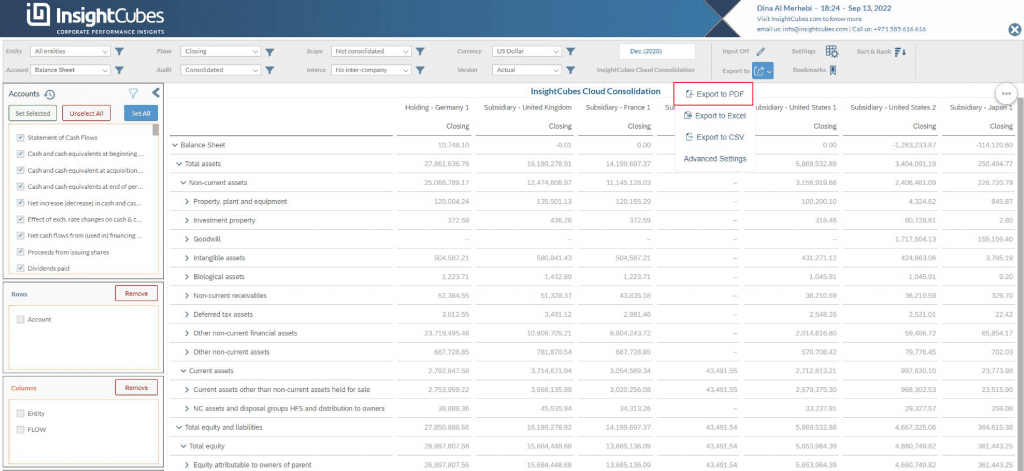
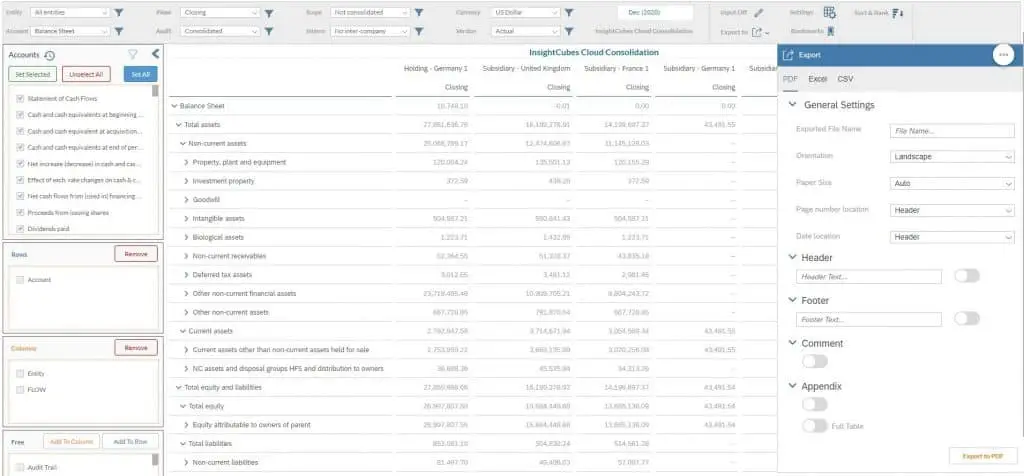
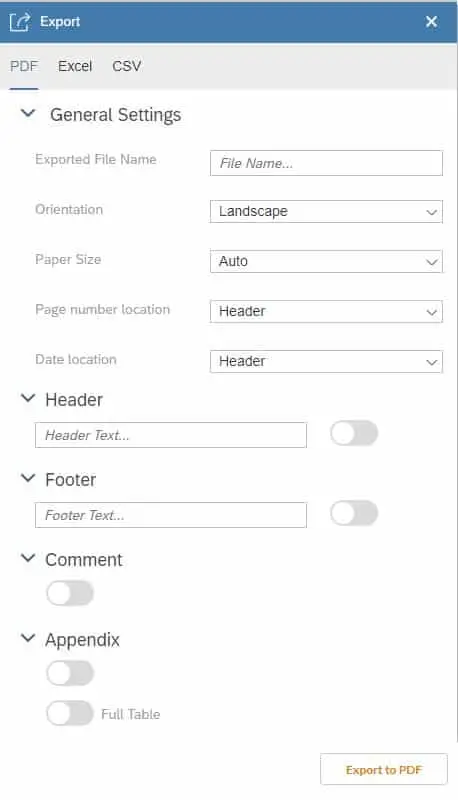
Upon clicking the Advanced Settings button from the “Export To” button, a popup with three tabs is visible:
- Excel
- CSV
We will be listing the components of each tab subsequently in detail.
Exporting to PDF
The first tab is Export to PDF, including all the advanced options needed to export the report to a PDF file as needed. The advanced settings tab for PDF includes Exporting File Name, Orientation, Paper Size, Page Number location, Date location under General Settings. Header Text input field with an On/Off switch . Footer Text input field with an On/Off switch. Switch to allow or prohibit Comments. Appendix On/Off Switch and an Switch option to include the entire Table. Last is the Export to PDF button and we will be listing how to configure them in the same order shown in the snippet below.
Add this line of code to the “Exported File Name” input field onChange fx: ExportToPDF.setFileName(this.getValue());
You will find this input field referenced in two other locations, one in the Advanced Export to PDF button starting (Line 8), and one in the Utils._Model-onInit (Line 9). You will find them later in this blog.
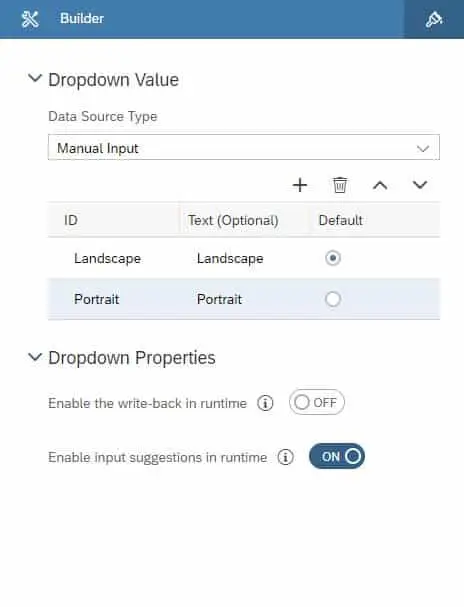
Manually select the Orientation from the dropdown, as shown below.
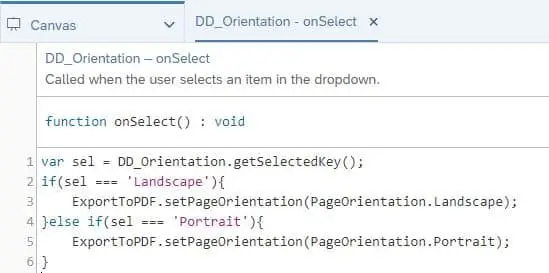
Then add the below code to the Dropdown onSelect fx
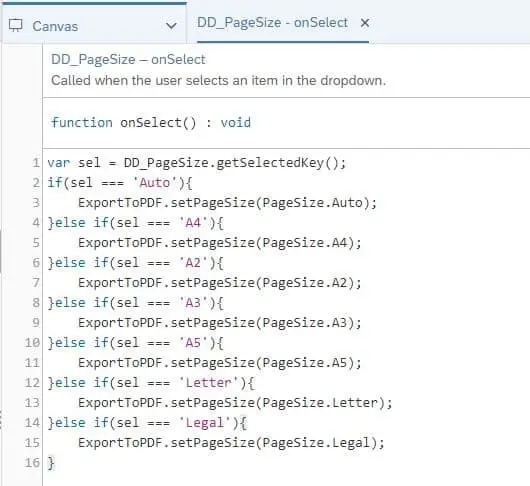
Manually input the Paper Sizes to the dropdown as shown below
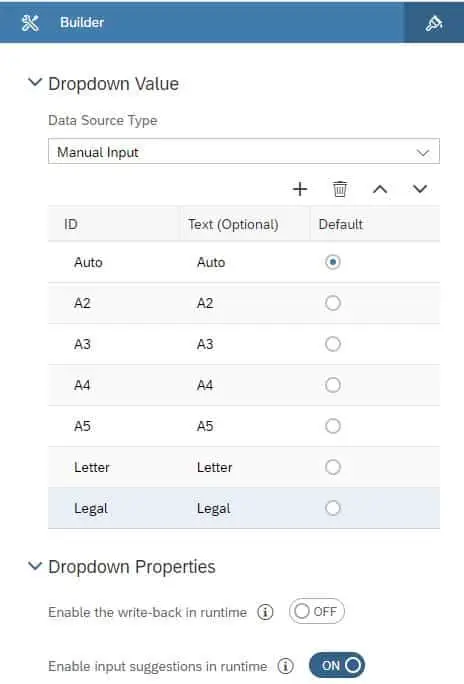
Then add the below code to the onSelect fx event of the dropdown
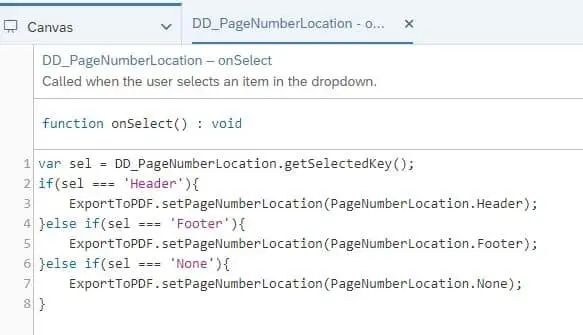
Manually input the Page Number Location to the dropdown as shown below
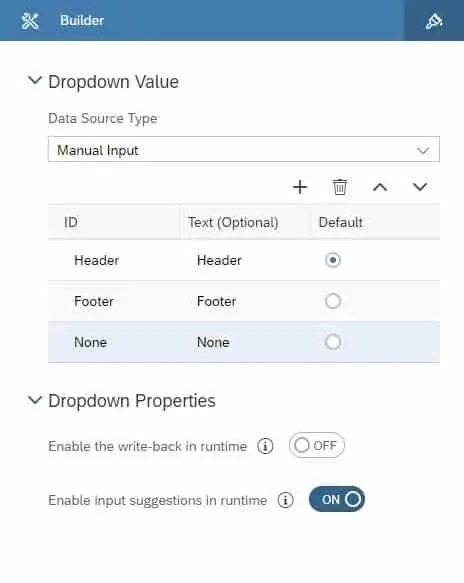
And add the below code to the Page Number location dropdown onSelect fx
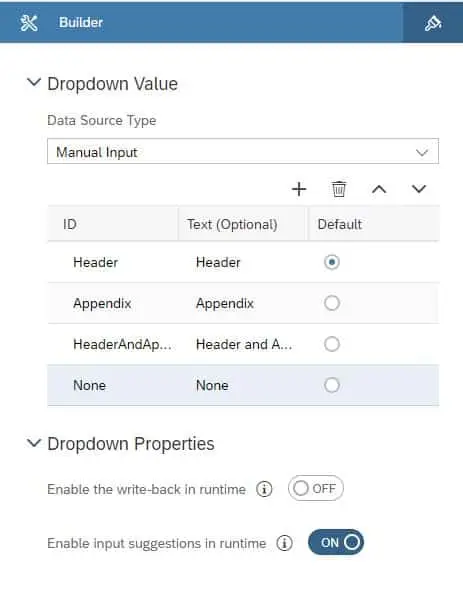
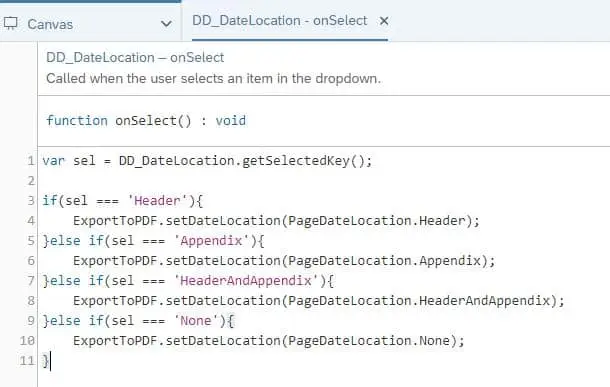
Manually input the locations for the date in the PDF to the dropdown Designer
Write the following code to the Date Location dropdown onSelect fx
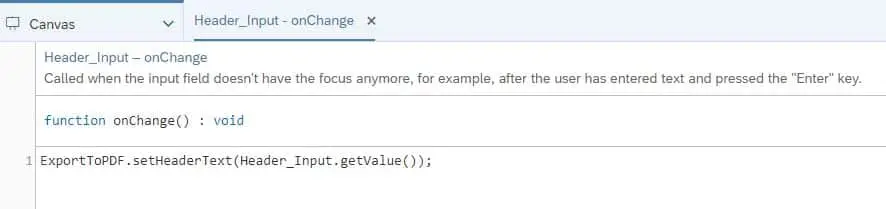
Add the following code to the Header Text input field onChange fx
And the following to the Header switch onChange fx

Do the same for the Footer Text input field. Add this line of code to the Footer Text input field onChange fx: ExportToPDF.setFooterText(Footer_Input.getValue());
And this line to the Footer Text switch onChange fx: ExportToPDF.setFooterVisible(this.isOn());
Comment switch onChange fx: ExportToPDF.setCommentsVisible(this.isOn());
Appendix first switch onChange fx: ExportToPDF.setAppendixVisible(this.isOn());
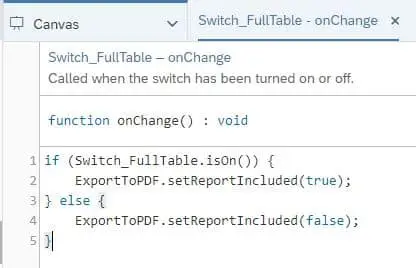
Appendix Full Table switch onChange fx
As mentioned in the beginning of this PDF section we have to create a Script Object, call it Utils_Model and add a Script Function called “onInit”, with a Return Type: void. Without switching on Set as Array and no Arguments to set the Export file name for PDF (Line 9), Excel and CSV (Lines 8, 10) Exporting File name fx.
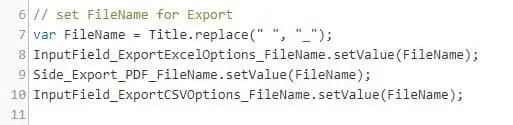
Figure 1.1
Lastly for the PDF Export is the “Export to PDF” button. Add the following code to the buttons’ onClick fx, and you are ready to Export reports to PDF files.
Exporting to Excel
The second tab is Export to Excel, including all the advanced options available in the backend of the Analytics Designer. These options can be used in the simple export method but are fixed and cant be changed on the run application. We have configured the settings to be available for users in the run application for an advanced end-level ease of use. The Export to Excel advanced settings tab includes Exported File Name, Include Table Metadata, Include Number Formatting, and Keep Hierarchical Indentation for the Data Labels switches and we will be listing how to configure them in the same order shown in the snippet below.
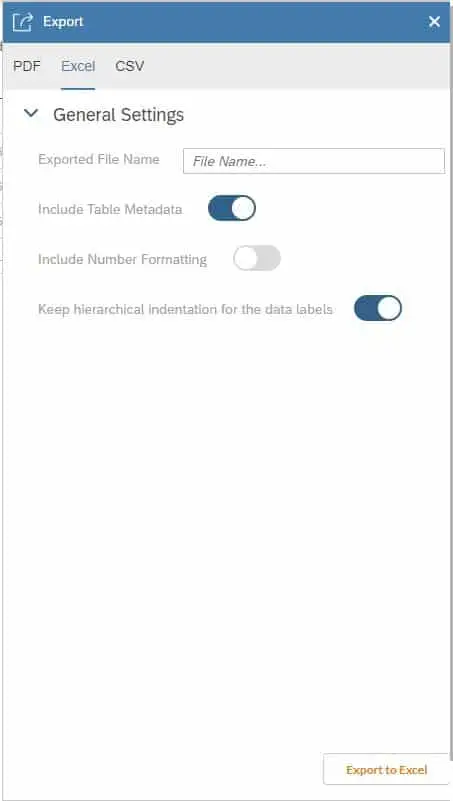
On the “Exported File Name” input field onChange fx add this line of code: ExportToExcel.setFileName(this.getValue());
Refer to Figure 1.1 for the other code needed to set the “FileName” in the “Utils_Model” “onInit” (Line 8). And on the “Advanced Export to Excel” button onClick fx starting (Line 3).
Add the following code to the “Include Table Metadata” Switch onChange fx: ExportToExcel.setAppendixIncluded(this.isOn());
The following to the “Include Number Formatting” Switch onChange fx: ExportToExcel.setExportFormattedValues(this.isOn());
Last add this code to the “Keep Hierarchal Indentation for the Data Labels” Switch onChange fx: ExportToExcel.setIndentedHierarchy(this.isOn());
Exporting to CSV
The third tab is Export to CSV, like the export to Excel Tab it includes all the advanced options available in the backend of the Analytics Designer. These options can be used in the simple export method but are fixed and cant be changed on the run application. We have configured the settings to be available for users in the run application for an advanced end-level ease of use. The Export to CSV advanced settings tab includes Exported File Name, Scope, Include Number Formatting, and Show Hierarchal in separate columns switches and we will be listing how to configure them in the same order shown in the snippet below.
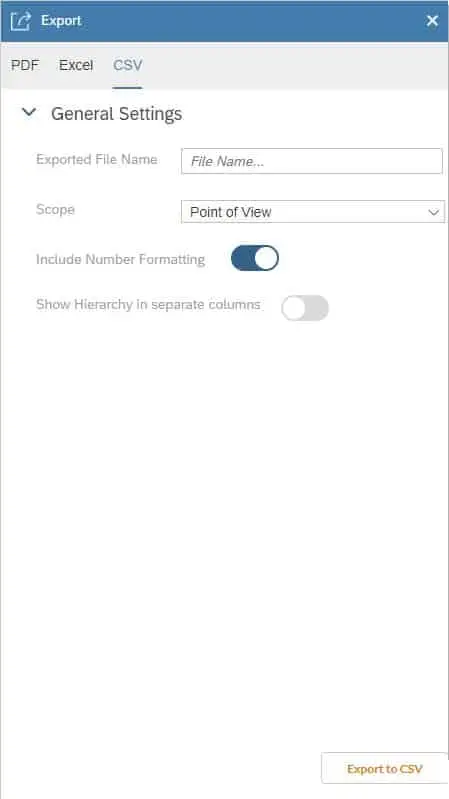
On the “Exported File Name” input field onChange fx add this line of code: ExportToCSV.setFileName(this.getValue());
Refer to Figure 1.1 for the other code needed to set the “FileName” in the “Utils_Model” “onInit” (Line 10). And on the “Advanced Export to CSV” button onClick fx starting (Line 3).
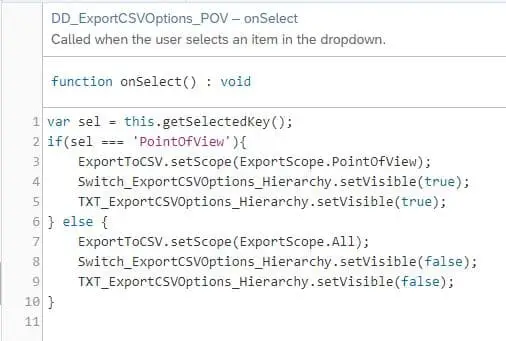
Add the following code to the “Scope” Dropdown onSelect fx
The following to the “Include Number Formatting” Switch onChange fx: ExportToCSV.setExportFormattedValues(this.isOn());
Last add this code to the “Show Hierarchy in Separate Columns” Switch onChange fx: ExportToCSV.setHierarchyLevelsInIndividualCells(this.isOn());
For the “Show Hierarchy in Separate Columns” Switch you will find two more lines of code (Line 4, and 8) on the Scope Dropdown onSelect fx called “DD_ExportCSVOptions_POV” in Figure 1.2.
Now you can export with SAP Analytics Designer.